If you’ve ever experienced an energetic release in a deep hip or heart opener or have felt invigorated by a few Sun Salutations, you can attest to the feel-good power of yoga. But other times, your practice may involve uncomfortable postures. These have benefits, too. They help you learn about yourself and your resistance—whether it’s physical, psychological, or emotional, says Judith Hanson Lasater, Ph.D., PT, who’s been teaching since 1971.
“The gifts of doing this [type of] work are endless, but it comes with some inherent physical risks,” she says. Yoga can cause musculoskeletal pain and exacerbate existing injuries, according to research.
One study found that from 2001 to 2014, yoga-related injuries doubled for people between ages 45 and 64—and increased eightfold for those 65 and older. This may be because the older age group is more likely to have preexisting conditions, such as spinal issues, decreased bone density, and low flexibility, which could contribute to injuries. The surge in yoga teachers, coupled with a lack of standardized training, may also play a role, the study authors say.
The solution for reaping the healing benefits without harm? Practicing with intention—from the time you roll out your mat until you’re blissed out in Savasana (Corpse Pose). Here’s how.
For an eco-friendly thick mat, try Manduka PRO Yoga Mat.
Warmup Your Wrists, Shoulders, Hips, Backs, and Knees
A few Sun Salutations at the beginning of class may not be the ideal prep for asana practice, says Jill Miller, co-founder of Tune Up Fitness Worldwide and author of The Roll Model. “Most of us come to our yoga mats after sitting all day and then expect our bodies to move into shapes that are really demanding on our muscles and joints,” she says. “It’s a recipe for injury.”
Take a pose as seemingly basic as Adho Mukha Svanasana (Downward-Facing Dog Pose), Miller says: You’re asking your arms, wrists, and hands to hold a substantial amount of your body weight—usually after a day spent typing or holding your phone.
Supporting underlying injuries or weaknesses with the right pre-yoga moves can go a long way toward staying safe as you practice. Here, Miller shares her favorite five-minute warmups for commonly injured body parts. Short on time? Prioritize the spots that give you the most trouble.
1. Wrists
Most people’s wrist extensors (the muscles that run from the elbow along the backside of the forearm to the wrist) are weak. As a result, they’re often unable to handle the pressure put on them when they’re, say, bent at a 45-degree angle in Down Dog or a 90-degree flexion in Urdhva Mukha Svanasana (Upward-Facing Dog Pose).
The Warmup: Start in Tabletop. Place a myofascial massage ball under your right palm, between your thumb and your index finger, and press down. After 30 seconds, maintain pressure on the ball while moving your thumb and index finger toward each other. After 30 seconds, move the ball around your palm to massage the rest of your hand, adjusting the pressure as needed. Repeat on the other side. Engaging the hand muscles helps turn on the muscles in your forearms, shoulders, and core that can take the burden off your wrists when you’re in weight-bearing poses.
see also Try These Poses to Release Stress and Care for Tight Hips and Shoulders
2. Shoulders
Spending hours hunched over your computer with your back rounded can mess with your posture, which makes it harder to use proper alignment as you move through postures like Down Dog, Plank Pose, and Up Dog.
The Warmup: While standing, hold a strap taut in front of you at shoulder height, keeping your arms straight and hands slightly wider than your body. Raise the strap above your head, then behind your back as far as is comfortable. Keep tension on the strap as you bring it back in front of you. Repeat 5–10 times. This exercise moves the head of your upper arm through a full range of internal and external rotation, helping you wake up your shoulders so they’re ready for the range of motion your asana practice demands.
3. Hips
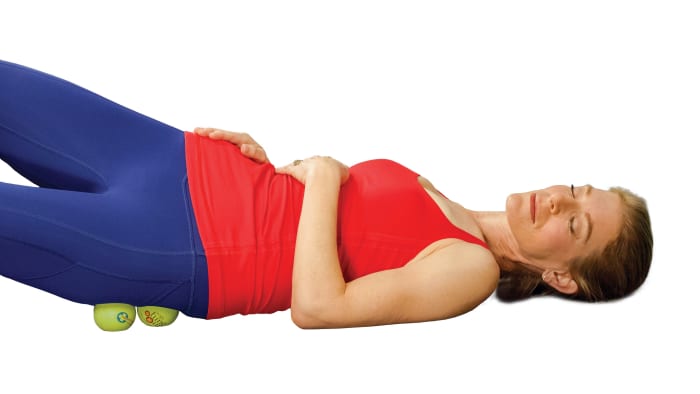
Sitting for long periods of time causes glutes to turn off and spreads the fascia in these muscles out of alignment with the hip joint. The result: decreased stability and an increased risk of injury in your pelvic area. “I know this sounds funny, but you’ve got to pile your butt back onto your butt—move the muscles and fascia of your tush back toward your sacrum before you practice,” Miller says.
The Warmup: Lie on your side with two myofascial release balls under the fleshy part of your right hip. While pressing down into the balls, roll them toward your sacrum, maneuvering your glutes toward the centerline of your body. Repeat for up to 5 minutes, then repeat on the other side. When you stand up, you should feel like you’re able to contract your glutes more easily.
4. Back
Hunching over a desk creates an extreme C curve of the spine, which causes the erector spinae—the little muscles and tendons that run along your spine and help maintain good posture—to overstretch. As a result, they become loose and unable to help you flex your spine in positions like Urdhva Hastasana (Upward Salute) or Uttanasana (Standing Forward Bend).
The Warmup: Place your mat so the short side touches the wall. Lie on your back and press the balls of your feet into the wall. Keeping your arms at your sides, tilt your hip bones toward your rib cage, and activate your abs as if you’re in the middle of a crunch. Without using your arms, slowly peel your spine away from the floor, vertebra by vertebra. Slowly lower back down to the mat, then repeat 5 times. The simple movement turns on your erector spinae to help keep your spine safe during your practice.
For a set of blocks to support you in your practice, try Gaiam Essentials Yoga Block (Set of 2).
5. Knees
There’s a reason most yoga teachers tell you to activate your quadriceps: Strong quads help center your knee joints, keeping them in good alignment as you squat, bend, lunge, or straighten your legs in your practice.
The Warmup: Sit in Dandasana (Staff Pose), then separate your feet, externally rotate your hips, and make a V shape with your legs. Hyperextend your right knee and lift your right leg an inch off the floor, feeling your quad do all the work. Hold for 10 seconds, lower, then repeat on the other side. If your vastus medialis (the inner quad muscle that extends the knee) cramps, start with a 4-second hold and build up to longer.
Find More Stability in Yoga Poses
The desire to push further into what we think a pose should look like overtakes most yogis at some point—and often leads to injury. “When your ego gets invested in how your body should look or feel, you lose access to the intelligent, intuitive information your body is actually trying to give you,” says Annie Carpenter, creator of SmartFLOW, a vinyasa-style yoga practice grounded in both modern anatomy and classical yoga philosophy.
The Antidote: Think of every movement on a continuum of motion that has an extreme expression at one end and a means for backing out of that effort at the other end. Many people work too hard to get into certain shapes and forget about easing out of them, and that’s when they get injured, Carpenter says. Here are three poses in which she sees many yogis pushing too far—and the cues that’ll help you find more stability and safety in your practice.
see also Deepen Your Self-Awareness With This Gentle, Holistic Yoga Therapy and Meditation Practice
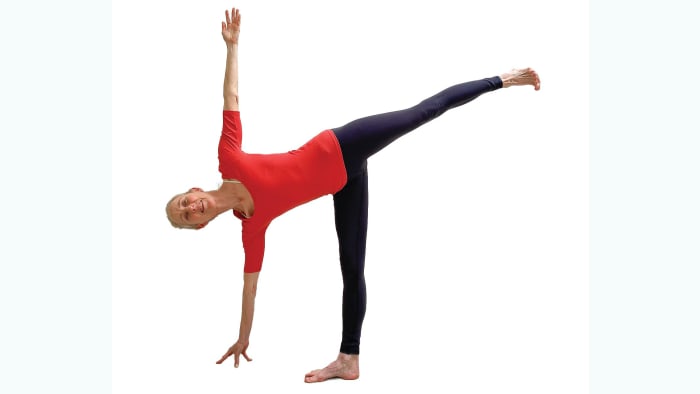
Press the top of your calf muscle forward, activating all the muscles of the back of your leg.
Courtesy of Kim Lally
Ardha Chandrasana (Half Moon Pose)
The Tendency: To hyperextend your knee on the standing leg in order to get more lift.
Stay Safe: Put a little weight in your fingertips and lift your front heel a half-inch off the mat. Then, put your heel down again. You should feel the top of your calf muscle moving forward. Keeping that action, lift your kneecap up—then straighten your leg.
Why It Works: You’re engaging your standing leg’s entire posterior chain, which makes it almost impossible to hyperextend your knee.
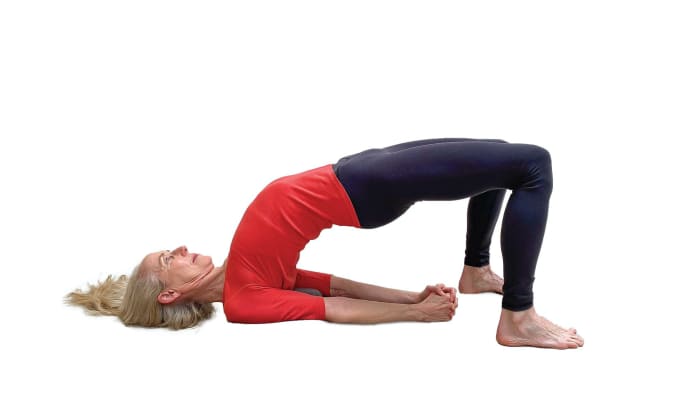
Setu Bandha Sarvangasana (Bridge Pose)
The Tendency: To squeeze your outer thighs in too much or let your knees splay out in order to lift your hips higher.
Stay Safe: Place a block between your thighs as you come up into Bridge Pose, then squeeze and release the block multiple times, noticing how this engages the inseams of your legs (adductors). Next, place a strap taut around your mid-thighs and push out, paying attention to how this activates your outer thighs (abductors). Then try the pose without props, balancing both adduction and abduction in each of your legs.
Why It Works: Often you have to see what only adduction or only abduction feels like in order to make micro-adjustments during your practice. When you can find equanimity between both actions, you stabilize the bones of your pelvis and keep your knees and low back safe.
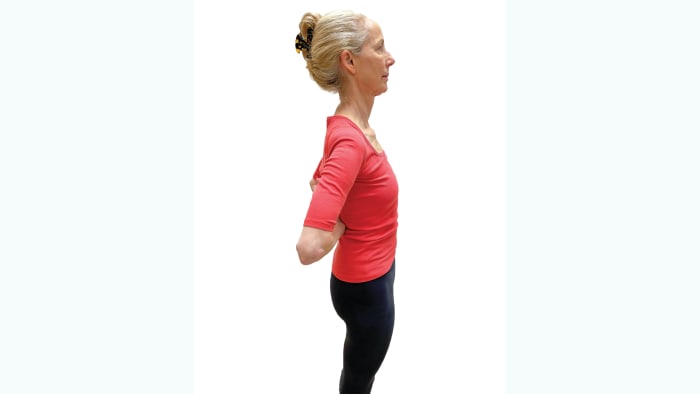
Viparita Namaskar (Reversed Prayer Pose)
The Tendency: To collapse your chest as you internally rotate your upper arm bones in order to touch your hands behind you.
Stay Safe: With your arms straight back behind you and your palms facing up, wrap a strap with a shoulder-sized loop around your wrists. Push out against the strap, externally rotate your upper arm bones, and move your shoulder blades down your back without letting your bottom ribs move forward. If that goes well, bring your arms back and up (it might just be a couple of inches). If that goes well, try again with your fingers interlaced and palms pressing together. Finally, try again with your hands in reverse namaste.
Why It Works: Externally rotating the arm bones prevents your shoulders from rolling forward, which can compress your cervical spine and keeps you from getting the posture’s chest-opening benefits.
For a prop to help you in your bridge pose, try UpCircleSeven Yoga Wheel.
Practice Safely Online
Chelsea Jackson Roberts, Ph.D., a Peloton yoga instructor, shares her advice for avoiding injury when your teacher isn’t in the room to spot you.
Listen to your body, not your ego.
Pushing yourself too far in a pose, whether it’s trying to touch your toes in Standing Forward Bend or balance in Headstand, is a recipe for injury. Use your breath to find the sweet spot between working hard and not too hard (or not at all).
If you find yourself breathing at a faster pace in a pose, ease back.
On the other hand, if you’re able to have a conversation with your kid in the other room when the on-screen teacher asks you to hold Utkatasana (Chair Pose), you might be able to drop your hips a little deeper.
Try different teachers.
Moving through the same classes on autopilot can cause overuse injuries from doing the same types of movements too frequently or not paying attention to good form. Since there’s a lot of variety in how teachers sequence their classes and cue poses, alternating classes and teachers can introduce you to layers of subtleties you might not have known.
Invest in some props.
Constantly ask yourself, What do I need to do to support myself in this shape? Often, that means literally using support in the form of blocks, straps, and blankets. Set your home space up with this gear.
see also Try This Restorative, Hip-Opening Yoga Sequence for Ultimate Rejuvenation
Focus on Proper Alignment
“I travel around the world teaching and have noticed there are a number of commonly taught principles in yoga classes that are just not based in anatomical reality,” says Lasater, author of Yoga Myths: What You Need to Learn and Unlearn for a Safe and Healthy Yoga Practice. “They’re not helping anyone and, worse, could be causing a lot of harm.” Here are Lasater’s picks for two cues to ditch.
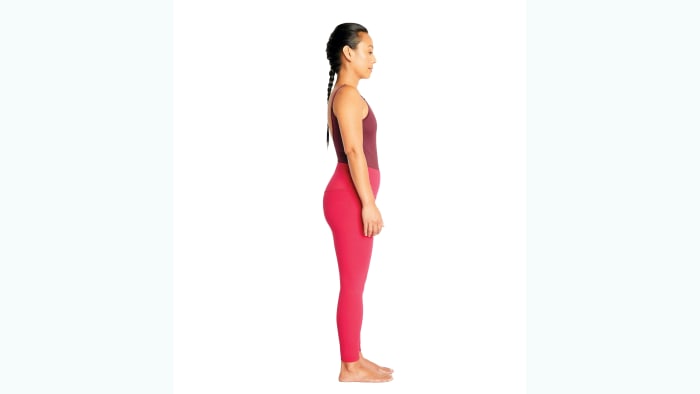
When your lumbar spine is in its natural curve, your sacrum is about a 30-degree angle from vertical.
David Martinez
1.“Tuck your tailbone in Tadasana (Mountain Pose)”
Doing so distorts the natural curve in your lower spine and destabilizes the sacroiliac (SI) joint between your sacrum and your ilia (the pair of large bones of the pelvis), which can cause low back pain. You’ll likely compensate by over lifting your breastbone, which flattens your thoracic curve—which is too much for a neutral standing position.
Do this instead: Find a doorway and stand with your back against one of the corners. With your feet parallel to each other and a little wider than hip-width, place your tailbone, mid-thoracic spine, and the back of your head against the slightly sharp edge of the wall. Make sure your chin is parallel to the floor, and stand here for a few breaths, noticing how free your breathing feels. The diaphragm is connected to the L1 vertebra, so when you keep the lumbar spine in this natural curve, you can breathe more freely.To feel the normal scapular movement, reach up as though grabbing something high on a shelf.
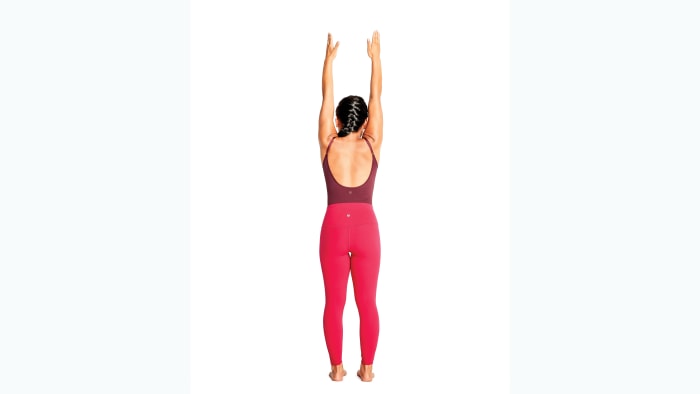
To feel the normal scapular movement, reach up as though grabbing something high on a shelf.
David Martinez
2. “Drop your shoulders down your back as you reach your arms skyward"
To understand the shoulder joint, you need to get to know your scapula, which is the key to how we move the entire upper extremity. Try this: While standing, without interfering with the natural movement of your scapula, slowly abduct one of your arms out to your side. Notice that your scapula doesn’t move very much at the beginning of the movement, but as you continue to move your arm skyward, you’ll immediately feel your scapula elevate and rotate. This rotation and elevation is a normal part of flexion and helps prevent injury.
Do this instead: As you raise your arms above your head, imagine you are reaching for something you want that’s on a high shelf. Really stretch up without thinking about your movement. You’ll notice the outside, or lateral border, of your scapula, moves up. As it does, feel how much freedom you have to move in your shoulder joint.
For a prop to help you stretch easier, try SANKUU Yoga Strap.
Ease Back After an Injury
Four days after her second hip replacement, yoga teacher Cyndi Lee tried doing some gentle movements along with her breath—from her bed. The founder of OM Yoga Center in New York City quickly realized that these simple postures didn’t just help her reclaim her identity as a yogi, but also gave her a sense of embodiment. “If you’ve been cut open and pulled apart, it’s hard to feel integrated with your body,” she says. “But when you coordinate even the simplest movements with your breath, it’s a gathering together of your body and mind that can help you feel that integration again.”
Pranayama With simple arm movement
Sit on the edge of your bed or a comfortable chair with your back straight and your feet planted on the ground. Inhale for a count of 4 (or less, if that’s more comfortable) and exhale for a count of 4. After a few rounds of this equal-length breathing, add some arm movement. On each inhalation, lift your arms out to your sides and up toward your ears, and on each exhalation, bring them back down to rest beside your hips. Do this as many times as you want.
Gentle side bend
On an inhalation, raise your left arm out to the side and above your head so that your biceps are beside your ear. On an exhalation, gently bend your torso toward your right, feeling a stretch in your left side. On an inhalation, return to standing and repeat on the other side. This basic movement helps open your lungs, rib cage, and back—all of which can get really tight and funky when you’re in bed for extended periods of time.
Gentle twist
On an inhalation, raise your left arm out to the side and above your head so that your biceps are beside your ear. On an exhalation, gently twist to your right, moving your left hand down and across your body to place it on your right thigh while moving your right hand behind you on the bed or chair. Stay here for a couple of breaths, being careful not to go too far into the twist. On your next inhalation, return to the starting position. Repeat on the other side.
Arm activation
On an inhalation, raise both of your arms out to either side and hold them at shoulder height. On an exhalation, externally rotate both arms so your palms face the ceiling; on an inhalation, internally rotate both arms so your palms face the floor. Continue these movements on the breath for 30 seconds to a minute.
Simple chest opener
On an inhalation, reach your hands behind your back, and interlace your fingers. Stay here, and return to the equal-length breathing you started with, focusing on lifting your chest and squeezing your shoulder blades together.
Garudasana (Eagle Pose) variation
On an inhalation, reach your arms in front of you so they’re parallel to the floor, and spread your shoulder blades wide across your back. On an exhalation, cross your right arm over your left and bend your elbows, raising your forearms so they’re perpendicular to the floor. The backs of your hands can face each other. Return to equal-length breathing, lifting your elbows up and stretching your fingers toward the ceiling. Stay here for at least 30 seconds, then repeat on the other side.
see also 10 Ways to Get Real About Your Body’s Limitations & Avoid Yoga Injuries
We independently source all of the products that we feature on yogajournal.com. If you buy from the links on our site, we may receive an affiliate commission, which in turn supports our work.

